DIY Low Wattage Attenuator Box
Most valve amps need to be run loud to get a good tone out of them, which often makes it difficult when performing in intimate settings, playing late at night or if you have picky neighbours. An attenuator is an electronics device that reduces the amplitude of a signal without appreciably distorting its waveform – perfect for getting that cranked amp sound, at a lower, more manageable volume level.

This simple attenuator box will allow lower wattage (less than 30 watt) amp users to push their amps that little bit more and maintain a reasonable volume level, with little tonal effect at low attenuation levels. The best thing is that it costs around $40 to build, so why not give it a shot?
Introduction
I stumbled upon this device when looking into attenuators for my amp. I wanted to push the amp a little harder, but could not justify the cost of the high end attenuators. This is not enough to tame a 100 watt Marshall on Warp 9, but enough to push a 15 watter than little bit harder and bring the volume back a notch, which is exactly what I was after.
This little attenuation box is good for low attenuation levels. As you start to attenuate your signal heavily you will, like most attenuators, notice some tone suck. If you stay below around 6dB of attenuation though, you should have very little, if any, effect on your tone.
You can modify this circuit more and add in some capacitors across the wipers of the L-Pad, to bring some treble back into your signal if you decide to attenuate heavily, as this is usually the first thing that gets sucked from your tone.
This circuit also has a DPDT switch built in so it can be true-bypassed, allowing you to leave it permanently connected in the back of your amp and bypassed when not needed. Technically the DPDT is not really needed as the attenuator does not really affect the signal when set on zero, but some people like having a circuit bypassed completely if it is not needed.
Although the L-Pad used is rated at 50 watt RMS, that doesn’t mean you can use a 50 watt amp with it. A tube amp dimed will put out more than it’s rated power, so I would stay under 30 watts if possible. It all does depend on how hard you drive the amp, and the level of attenuation. If you are not running your amp full pelt and not attenuating to heavily, you may be okay pushing the boundaries a little in terms of amp wattage. If you do decide to push the boundary a little, please keep a check on the L-Pad temperature. If it is getting too hot, stop immediately, as it can fail.
Parts
Parts needed to build this attenuator are listed below. I source all my electronics parts from Jaycar Electronics so I have included the Jaycar part numbers too.
- 1 x 50 watt RMS Fader Mono – CAT. NO. AC1672 (Also known as a L-Pad)
- 2 x 6.5mm Mono Chassis Socket – CAT. NO. PS0162
- 1 x DPDT Miniature Toggle Switch – CAT. NO. ST0572
- 1 x Sealed Diecast Aluminum Enclosure – CAT. NO. HB5064
Schematic
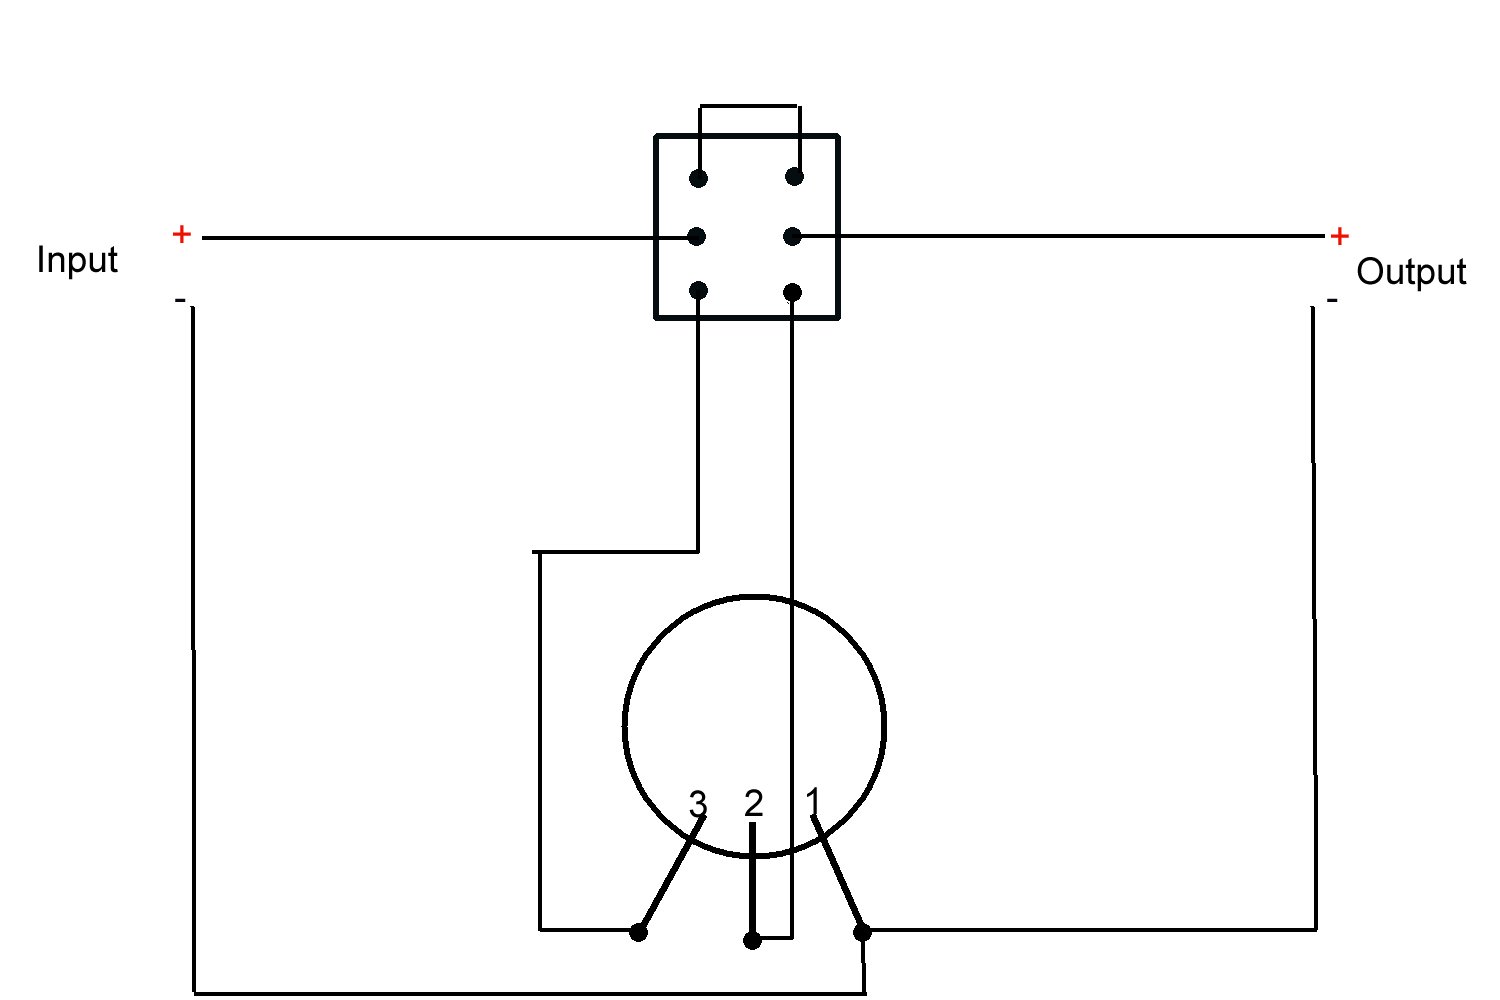
Here is the schematic diagram for the attenuator:
Assembly
Assembling this attenuator is not too difficult and involves drilling a few holes into the aluminum box and soldering a few connections.
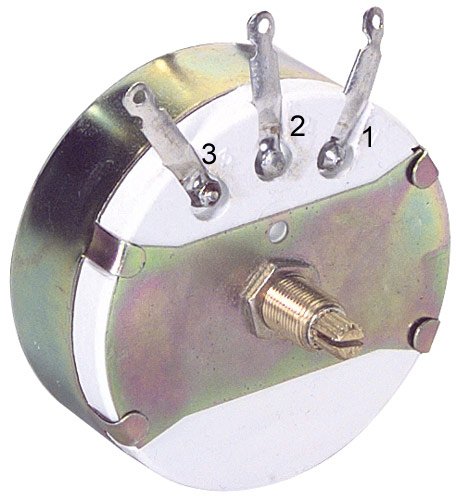
If you look closely at the front of the L-Pad you’ll notice that the legs are numbered 1, 2 and 3.
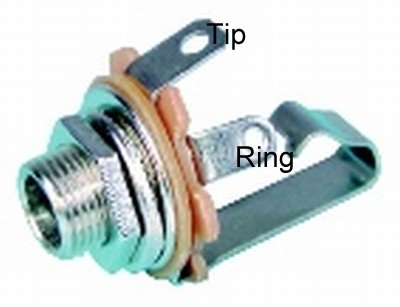
A picture showing the 6.5mm jack is shown, with the ‘Tip’ and ‘Ring’ connectors labeled.
If you are not going to use a switch then:
- Solder the tip of the input jack to leg 3 of the L-pad.
- Solder the tip of the output jack to leg 2 of the L-pad.
- Solder the ring of the input and output jack to leg 1 of the L-pad.
If you are using a switch:
- Solder the top two lugs of the switch together to ‘jumper’ them.
- Solder the tip of the input jack to the 1st middle lug of the switch.
- Solder the 2nd middle lug of the switch to the tip of the output jack.
- Solder the 1st bottom lug of the switch to Leg-3 of the L-pad.
- Solder the 2nd bottom lug of the switch to Leg-2 of the L-pad.
- Solder the ring of the input and output jack to leg 3 of the L-pad.
To mount the 6.5mm sockets and the L-Pad you will need a 10mm drill bit. Drilling through aluminum is easy, but one tip when drilling metal is to go slowly and work up to your final hole size. Start with a small size drill bit and go up in a few increments to reach your final hole size. I used a 1/8″, then a 3/16″, then a 1/4″, then finally drilled out the 10mm hole.
In the end I decided to drop the DPDT switch, as I needed a 12mm drill bit to mount it and didn’t have one on hand. I may fit it later on if I get my hands on a 12mm drill bit.
Using The Attenuator.
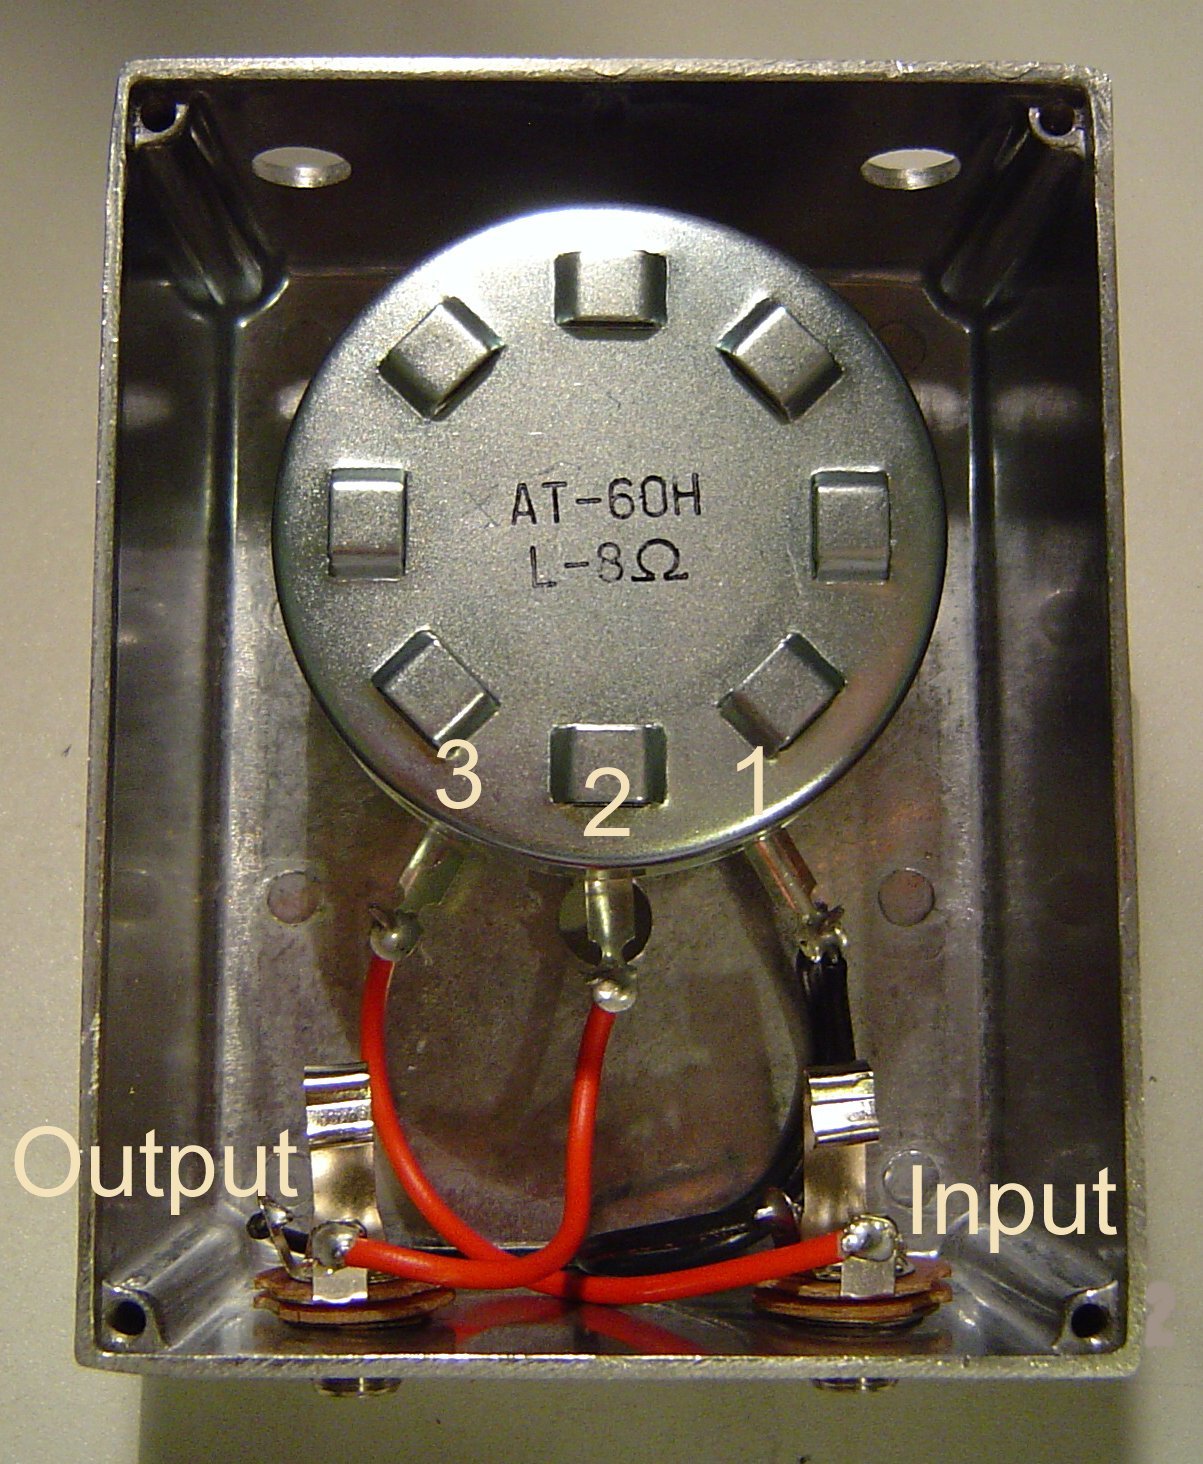
The attenuator is very simple to use. The jack on the left is the “input” jack, which connects to your amp and the other jack is the “output” to the speaker. The knob controls how loud the speaker is, it basically acts as a volume control. All the way to the right is “maximum”, which is maximum volume, or zero attenuation. All the way to the left is minimum volume ,or maximum attenuation.
Start with the knob all the way to right, on maximum, and then bring it down to achieve the level of attenuation you desire.

How Does It Sound?
I tried out this attenuator on my own amp, a Vox AC15cc. I found immediately that once you reach the 12 o’clock position, you start to notice a bit of tone suck creeping in. As you go further and further towards maximum attenuation, turning the knob to the left, the tone becomes more ‘lifeless’ as the guitar sound loses a lot of it’s attack, as well as the top end dropping off.
I leave knob set on about the 2-3 o’clock position, before any noticeable tone suck occurs, and dial my amp in from there when I’m using it. This way I’m getting the best compromise between attenuation and maintaining my tone, while being able to push my amp a little bit harder.
Conclusion
Given the price of this attenuator, it’s something worth trying out if you wish to bring the volume of your amp down a little. If you are attenuating heavily, do expect there to be some impact on your tone, although some people say you can compensate by dialing your amp in differently.
So you are using this with a Combo amp? Does this mean you have to disconnect the wires from the speaker and put it in between?
My Matamp Minimat (a 4 watt tube head) has a built in attenuator, and I also find the more I attenuate the signal, the more tone I lose.
Hi Jon,
Thanks for the question.
Depends on the amp. Most valve combos have their speakers wired using a 1/4″ Jack, so you can just unplug the speaker and run an extension cabinet easily. There are a few around that don’t offer this flexibility though.
If your amp doesn’t, you would have to disconnect the wires from your speakers and solder them to a 1/4″ jack. This would now be the output from your amp, which goes to the input on the attenuator. Then you would need to solder another set of wires to your speaker and fit a 1/4″ jack to the end of that, which goes to the output on the attenuator.
You would have to leave the box permanently fitted though and bypass it when you didn’t need it, as you couldn’t revert back to how it was originally without re-soldering the wires back.
Hope that helps. Let us know if you need any more clarification.
Thanks David yes that does help, the reason I ask is for a friend who just bought a 100 Watt Marshall combo (not an MG thats all I know). My Vox already has a built in power attenuator.
Is it a solid state amp or a valve amp?
You can’t use this with a 100 watt valve amp as it is too much power for this attenuator.
If it’s solid state you could probably get away with it, but try and source a 100 watt L-pad, although there’s probably no real benefit in attenuating a solid state amp.
[…] more about making a DIY: Attenuator Box for your amp Read more | Permalink | Comments | Read more articles in Music | Digg […]
[…] Found this cool how-to at Make today on creating your own Low Wattage Attenuator Box on the cheap (around $40). Use this box when you would like to boost your input signal on lower wattage amps without distorting your waveform giving you an extra punch. Link to project site… […]
Does this effect the amp? what about 4, 8 or 16 ohms?
does this matter ?
dave
David,
Thanks for the info.
There is much dsicussion on the web of power attenuators “smoking” the output transformer or the output tubes.
How has this L-pad performed?
I am looking to use it on a 5watt class A Epiphone VJnr as well as a 15watt Super Champ XD.
Any views?
Thanks
Greg
Hi Dave,
I recently stumbled on this post after looking around for exactly this and decided to make this Volume Box!
But my problem (other than knowing buggery all about electronics beyond how to solder a to b) is that i turn the attenuation down (more attenuation) and after about a 5mm turn it goes from really loud to quiet and high gain trebly in a instant, there is no in between at this point, is there something i may have done wrong? or something wrong with my l-pad?
Rupert
Great walk-through on the build. Where would that capacitor go, if you were trying to counteract the tone suck & how much of capacitor would it really need?
Haven’t tried one of these yet, but I did some research and if you are in the US you can get most of these parts from PartsExpress.com .
I put the equivalent searches on their site for the items you need:
•1 x 50 watt RMS Fader Mono – Search for “L-Pad”
•2 x 6.5mm Mono Chassis Socket – Search “1/4″ Mono Jack”
•1 x DPDT Miniature Toggle Switch – Search “Toggle Switch”
•1 x Sealed Diecast Aluminum Enclosure – Search “Diecast Case”
I like this design, but is there somewhere I can order a 16-ohm fader to use with my 16-ohm amp?
I’m not sure if this device can be classified as an attenuator. It’s more of a “master volume”, which can result in damage to your valve amp. (It’s like turning the water all the way on and pinching the end of the garden hose… something’s gotta give.
An attenuator, on the other hand, has circuits that “consume” or “eats” the output of the amp without restricting it’s performance. Sometimes attenuators use lamps to consume the output and will often have some sort of heat sink to cool the attenuator down. The more you attenuate, the more of the output it consumes resulting in a lower volume.
Thought you might like to know.
nice article and really great work !!!
but what about the amps outputs ?
i’m using an 8 ohm cabinet. do i have to use
the amps 16 ohm output if i switch the attentuator
between amp and cabinet ?
8 ohm (cabinet) + 8 ohm (attentuator) = 16 ohm (“dummy” cabinet)
is it like this ?
i would be pleased if you could give me an advice.
thanks a lot and have a nice day!
evil-chupacabra
I presume evil-chupacabra is wrong. If you build an 8 Ohm attenuator it is for the 8 ohm output of yuor amp – > attenuator -> 8 Ohm Speaker load.
Also is a 100 watt L pad suitable for a 50 watt Marshall?
ok… so i built something like this for my all tube, fender pro jr iii 18 watt…
the results worked fine for a while (one day) until something had to give (as the other post read)
it eventually ATE MY POWER TUBES! thank goodness the transformer did not get damaged!!!
i went the more profession way and bought a 50W webber attenuator… after replacing tubes all is still fine…
the webber uses high power resistors and a dummy load basically a speaker coil with out the speaker part and a few smaller resistors and capacitors for tone… with 4, 8, and 16 ohm options.. well worth the money
so… be careful VERY careful…
jp